Earlier this week a customer was having difficulty creating and showing a fillet weld in Pro/E WF 4. I put together a quick how to create a fillet weld and decided to post it here for the benefit of others. The steps are valid for previous versions of Pro/E WF but for WF 5 the Weld interface has been updated to utilize the dashboard like an extrusion or revolve feature so the steps are a little different for that.
Steps to Create a Fillet Weld
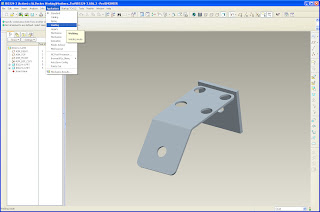
1. Select APPLICATIONS, WELDING from the Pro/E drop down menu.
2. Select the WELD FEATURE from the tool bar or from the INSERT drop down menu.
a. Define the Weld parameters/type in the WELD DEFINITION dialogue box.

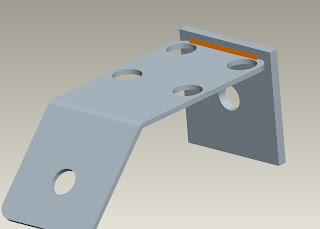
3. For a fillet weld select a set of surfaces that are in the same plane. This example shows only one surface being selected.
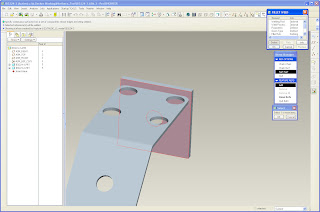
a. Select DONE REFS when you are done selecting the first set of surfaces.
4. For a fillet weld select a second set of surfaces that are in the same plane.

a. Select DONE REFS when you are done selecting the first set of surfaces.
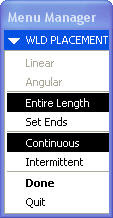
5. Specify if you want the weld to be continuous, intermittent, the entire length, or set the ends.
6. Specify the material side for the weld. The arrow points in the direction the weld will be added.
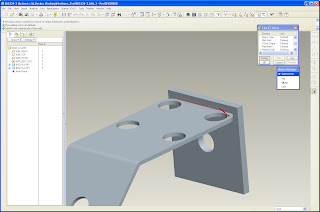
7. At this point specify any other options for the weld or hit the OK button to complete the weld.
8. For additional information about welds search the Pro/E help functionality or PTC's Knowledge Base.
1. Select APPLICATIONS, WELDING from the Pro/E drop down menu.

2. Select the WELD FEATURE from the tool bar or from the INSERT drop down menu.
a. Define the Weld parameters/type in the WELD DEFINITION dialogue box.

3. For a fillet weld select a set of surfaces that are in the same plane. This example shows only one surface being selected.

a. Select DONE REFS when you are done selecting the first set of surfaces.
4. For a fillet weld select a second set of surfaces that are in the same plane.

a. Select DONE REFS when you are done selecting the first set of surfaces.
5. Specify if you want the weld to be continuous, intermittent, the entire length, or set the ends.

6. Specify the material side for the weld. The arrow points in the direction the weld will be added.

7. At this point specify any other options for the weld or hit the OK button to complete the weld.

8. For additional information about welds search the Pro/E help functionality or PTC's Knowledge Base.